Title Management
- admin67410
- Mar 11
- 4 min read
Ensuring your titles are correctly set up is key to running Imprint Core effectively. This guide walks you through the Title Management page to make your financial workflows seamless.
The Title Management Page

⚡ How Imprint Automates Data: > When you import a royalty file, Imprint automatically checks the system. If a title does not exist, a new record is created. If a new ASIN/ISBN is found with the same title as an existing book, it is automatically linked as a new edition of that title. ACX audiobooks (which generally have "Unabridged" after the title) are also handled automatically!
Adding a new Title

The Goal: Manually create a Master Title record to hold your metadata, contracts, and formats.
Click the Add New Title button.
Enter the name of the new title and click OK to open the Title Metadata screen.
Select your Primary Author from the dropdown. (Note: Multi-author titles like anthologies are handled later in the Royalty Splits section, so just pick one primary name here).
Upload your cover art, Amazon/Goodreads URLs, and any Contracts (.doc, .docx, .pdf) for easy reference.
Set the title status to Active, Inactive, or Reverted.
Pro-Tip: Contract Warnings The Contract Signed, Date Published, and Rights Expiry fields are optional but highly recommended. Imprint Core will display a warning if a signed contract isn't published within 18 months, and will alert you a month before rights expire so you can manage your author relationships proactively.
Managing Editions

The Goal: Track different formats (Ebook, Paperback, Hardcover, Audio) under a single Master Title.
While editions are usually created automatically during imports, you can manage them manually on the Editions Tab. This is also where you input Unit Costs to track profitability for direct website sales and convention tracking.

To manually add or link an edition:
Add New: Click Add New Edition. Enter a unique Edition ID, format, title, and unit cost.
Unlink: Highlight an edition in the Linked Editions table and click Unlink Selected.
Move/Merge: Click Link / Move Edition to view all editions across your entire database. Select multiple editions and click Link Selected to attach them to your current master title.

Managing Advances and Royalty Splits

The Goal: Define how revenue is divided among co-authors, narrators, and the publisher.
Select the Royalty Split tab. Values here default to whatever standard contract split you set in the Author's main record (e.g., 50% Author / 50% Publisher).
Understanding Advances (Joint Accounting): Advances are applied to a title as a whole using standard Joint Accounting. They are based on the publisher's home currency and converted to the author's local currency during statement generation.
Example: Author A and Author B co-write a novel and receive a $1,000 advance ($500 each). They each get a 25% royalty share.
If the book earns $1,000 in month one, $250 is allocated to each author.
Imprint Core automatically adds their combined earnings ($500) and subtracts it from the outstanding advance. The remaining advance to earn out is now $500.

Format-Specific Splits & Anthologies:
You can assign specific splits for specific formats.
Audiobooks: If a narrator receives 20% of audiobook sales, add them here. The publisher's split is automatically reduced so the total payout never exceeds 100%.

Anthologies: Instead of paying outright, you can define royalty splits for every contributing author, specifying exactly which editions they are eligible to earn from.
Managing Production Costs

The Goal: Track your true Profit & Loss (P&L) to know exactly when a book breaks even.
Click the Production Costs button at the top of the screen.
Set the date, numeric value, and category of the expense (e.g., Cover Art, Editing, Marketing).
Click Add Expense.
You can now view the total financial health of the book on the Title P&L Analytics screen.
Managing Series

The Goal: Group titles together to view financial performance across an entire series.
Click Manage Series at the top of the Title Management screen.
Click Create Series and enter the name.
Select your new series in the Registry page and click Assign Titles. Highlight the books you want to include and click Assign Selected.

Alternative: On the main Title Management page, highlight multiple titles, click Set Series (Bulk), and choose your series from the dropdown.

Troubleshooting: Orphaned Editions & Wrong Authors
Sometimes, raw data gets messy. Imprint Core provides tools to fix unlinked data.
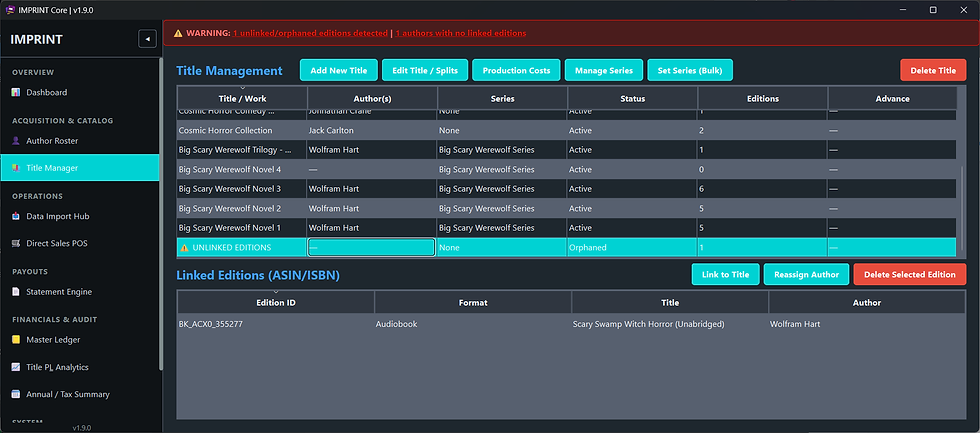
Fixing Orphaned Editions: If financial data exists for an edition that isn't linked to a master title, a warning will appear in the top message bar.
Click the warning to view unlinked editions.
Highlight the orphan in the table and click Link to Title.
Choose whether to create a new master title or assign it to an existing one.

Reassigning Authors: If an author is credited incorrectly (e.g., a narrator credited as the author by ACX):
Highlight the affected edition.
Click Reassign Author.
Select the correct name from your roster and click OK.

🚨 WARNING: Deleting Editions
Most actions in Imprint Core can be undone. The "Delete Selected Edition" button is the exception. If you click this and proceed past the warning, the edition and ALL financial records attached to it will be permanently destroyed. The only way to retrieve this data is to roll back your imports in the Data Import Hub and re-import the original spreadsheets, or restore a backup taken before the deletion.

Comments